
Are you ready to elevate your nail game? If you’ve been scrolling through social media and admiring those stunning, perfectly manicured nails, chances are you’ve come across the term “Russian manicure.” This trending technique is capturing the attention of beauty enthusiasts worldwide. With its meticulous approach and impressive results, it promises not just beautiful nails but also a unique pampering experience.
Unlike traditional manicures that often leave behind rough cuticles or uneven surfaces, Russian manicure focuses on precision and cleanliness. It’s all about achieving that flawless finish while ensuring your natural nails remain healthy. Whether you’re a newbie eager to learn or someone looking to refine their skills, this comprehensive guide will walk you through everything from tools to techniques. Let’s dive into the world of Russian manicures and discover how they can transform your nail care routine!
What is Russian Manicure?
Russian manicure is a modern nail care technique that originated in Eastern Europe. It emphasizes precision and attention to detail, setting it apart from more traditional methods.
Unlike conventional manicures that often involve soaking the nails in water, Russian manicures focus on dry techniques. This approach allows for better control when trimming cuticles and shaping the nail bed.
The process typically includes using electric tools designed specifically for this method. These tools help achieve an ultra-smooth finish by gently buffing away dead skin and perfecting the nail shape.
With its meticulous nature, a Russian manicure can last longer than standard treatments, making it a favorite among those who prioritize longevity alongside aesthetics. Each step is crafted to enhance both the beauty of your nails and the overall health of your hands.
Benefits of Russian Manicure
Russian manicure offers numerous advantages that set it apart from traditional methods. One of the most significant benefits is its focus on precision. The technique involves meticulous cuticle work, ensuring a clean and polished look.
Another advantage lies in its longevity. With proper application, Russian manicures can last longer than standard options, reducing the frequency of salon visits. This means more time enjoying your beautiful nails without worrying about regular touch-ups.
The procedure often promotes healthier nails as well. By using specialized tools designed for fine detailing, you minimize damage to the nail bed while nurturing growth.
Additionally, this method allows for greater creativity with nail art and designs due to the smooth canvas provided by meticulously prepared nails. Whether you’re looking for elegance or bold statements, Russian manicurists excel at bringing your vision to life through their skilled techniques.
Tools and Products Needed for a Russian Manicure
To perform a Russian manicure, having the right tools is essential. Start with a high-quality electric nail drill. This device is key for shaping and refining your nails.
You’ll also need various drill bits. Diamond bits are great for cuticle work, while sanding bands help smooth out the surface of the nails.
Don’t forget about cuticle pushers and nippers. These tools allow you to gently push back and trim excess skin without damaging your natural nail.
A good buffer will help achieve that perfect shine on your nails before applying any polish or gel.
Invest in high-grade polishes or gels specifically designed for Russian manicures. They adhere better and last longer, giving you a salon-quality finish at home.
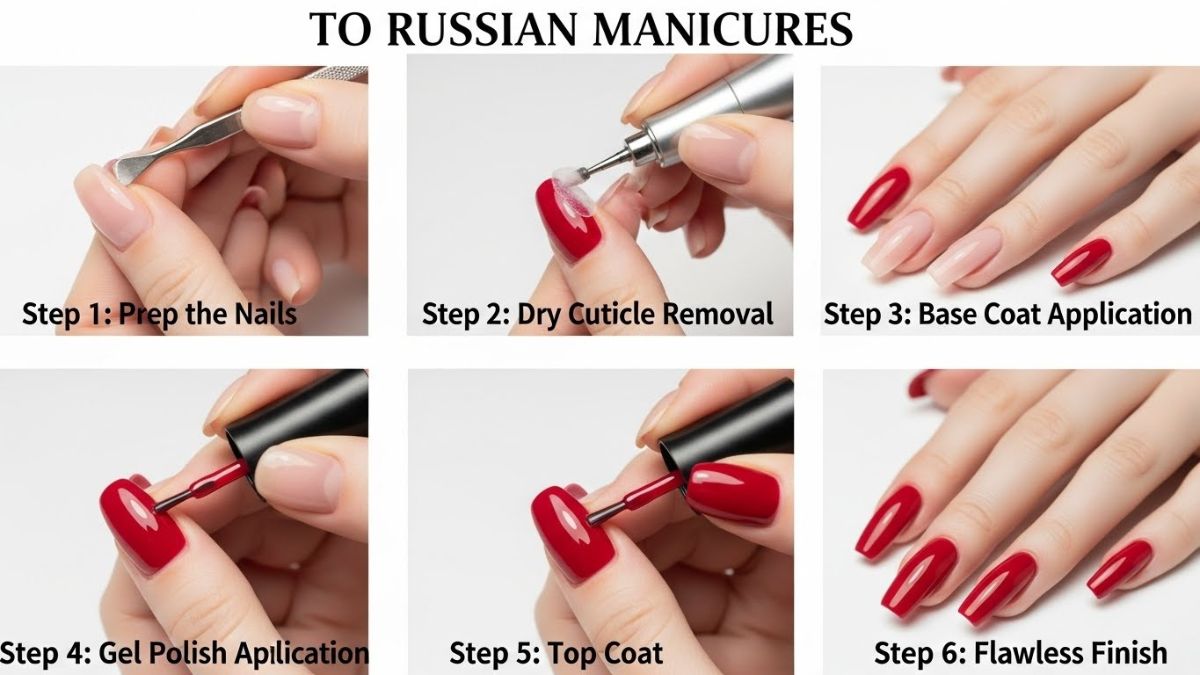
Step-by-Step Guide to Performing a Russian Manicure
Start by sanitizing your tools and ensuring your workspace is clean. This sets a professional tone for the manicure.
Soak your hands in warm, soapy water for about five minutes. This softens the cuticles, making them easier to work with.
Gently push back the cuticles using an orange stick or a cuticle pusher. Be careful not to apply too much pressure; you don’t want to damage the nail bed.
Next, trim excess cuticle skin carefully with nippers. Precision is key here—only remove what’s necessary for a neat look.
Use a fine-grit file to shape your nails as desired. Move in one direction to prevent splitting.
Finish off by buffing the surface of each nail gently, then cleanse any dust away before applying base coat and polish. Your Russian manicure is now ready to shine!
Maintenance and Aftercare Tips
To keep your Russian manicure looking fresh, regular maintenance is essential. First, avoid exposing your nails to harsh chemicals. This includes cleaning products that can strip away the shine and health of your polish.
Moisturize regularly. Use a quality cuticle oil or hand cream to nourish both the skin around your nails and the nail bed itself. Hydrated cuticles promote growth and prevent hangnails.
Try to limit direct sun exposure. Sunlight can fade colors over time, so consider wearing gloves when out for extended periods.
Avoid using your nails as tools; this prevents unnecessary breakage or chipping.
Schedule touch-ups every two weeks for optimal results. Regular visits ensure any lifting is addressed promptly and keeps everything looking pristine between appointments.
Common Mistakes to Avoid
One common mistake is rushing through the process. A Russian manicure requires precision and attention to detail. Take your time with each step for the best results.
Another misstep is neglecting nail prep. Properly cleaning and pushing back cuticles sets a solid foundation for your manicure. Skipping this can lead to uneven polish application.
Using the wrong tools can also derail your efforts. Ensure you’re using high-quality, specialized instruments designed for a Russian manicure. Dull or inappropriate tools may cause damage instead of enhancing your nails.
It’s crucial not to skip aftercare products either. Moisturizing and using cuticle oil post-manicure keeps nails healthy and prolongs wear time.
Avoid overexposing nails to water immediately after completing the service. This can weaken them before they have fully set, leading to chipping or lifting sooner than expected.
Comparison between Russian Manicure and Traditional Manicures
Russian manicures and traditional manicures differ significantly in technique and results. The Russian method emphasizes precision and detail, often involving a more extensive use of tools like electric drills for cuticle care. It focuses on achieving a flawless finish without the need for soaking.
On the other hand, traditional manicures typically start with soaking the hands to soften cuticles before pushing them back. This process can sometimes leave rough edges or unevenness around the nail bed.
While traditional techniques may prioritize relaxation, Russian manicures are all about meticulous work. As a result, many enthusiasts appreciate how long-lasting and neat their nails look after a Russian manicure session compared to conventional methods.
Choosing between these two styles depends largely on personal preference—whether you favor thorough detailing or enjoy the classic pampering experience of soaking your nails.
Conclusion
The allure of a Russian manicure lies in its precision and attention to detail. It offers a clean, polished look that many find irresistible.
As you explore this technique, remember it’s about enhancing the natural beauty of your nails. Each step contributes to achieving that flawless finish.
With practice and patience, anyone can master this method. Embrace the learning curve; it will be worth your effort.
Whether you’re at home or visiting a salon, understanding what goes into a Russian manicure elevates the experience. You’ll appreciate the process even more when you know how each tool works.
So dive in with confidence! Your nails are sure to reflect your newfound skills and knowledge beautifully.
FAQ’s
When it comes to embracing the art of nail care, many questions often arise. Here are a few frequently asked questions about Russian manicures that can help clear up any uncertainties.
What is the difference between a Russian manicure and a traditional manicure?
The primary distinction lies in technique. A Russian manicure uses advanced tools like electric files for precise cuticle work and shaping. Traditional manicures typically focus more on surface-level treatments without extensive cuticle removal.
Are Russian manicures safe for all nail types?
Yes, they can be performed safely on most nail types, but caution is advised for those with sensitive skin or conditions like eczema. Always consult with your technician beforehand.
How often should I get a Russian manicure?
Depending on your nail growth rate and personal preference, you may consider getting one every two to four weeks. Regular maintenance will keep your nails looking their best.
Can I perform a Russian manicure at home?
Absolutely! With practice and the right tools, beginners can certainly try it at home. However, it’s beneficial to watch instructional videos or even take classes before diving in.
What products do I need to maintain my nails post-manicure?
Aftercare products include quality moisturizers for hands and cuticles as well as strengthening polishes if you’re looking to enhance durability between sessions.
Is there any pain associated with this type of manicure?
While some people might experience slight discomfort from the electric file or cuticle trimming, an experienced technician will ensure minimal discomfort during the process.
By addressing these common queries, anyone interested in exploring this trending technique can feel more confident moving forward with their own beauty regime focused around the captivating world of Russian manicures.